More...

More...
|
| © 1998 |
 |
# The subroutine to create a table for our ads.
sub setads
{
# Open a connection to the database.
my $dbh1 = Msql->connect();
$dbh1->selectdb('mydb');
# Get the ads from the database. We assume
# here that there is at least 1 ad in the
# "ads" table. We also assume the table has
# the format of
# 1. imagename
# 2. URL
# The results from the database query are stored
# in the @results variable. This list variable
# will contain one array element for each field
# in the "ads" table.
$sth2 = $dbh1->query("SELECT * FROM ads");
while ( (@result = $sth->fetchrow)
{
# Add a <td> entry with the image for the ad
# linked to the specified URL. The "a({-href"
# portion is where we use the CGI.pm
# a() function to establish the hyperlink.
push
(@tableelments,
td({-align=>'CENTER', -valign=>'CENTER'},
a({-href=>"$result[1]"},
img( { -src=>"/images/$result[0]",
-alt=>"$results[1]",
-border=>'0',
-hspace=>'0', -vspace=>'0' }
)
)
)
)
}
If we now include this module in our main script we can then print out the advertisement table at any time we wish:
print header,
start_html(
-author=>'[email protected]',
-title=>'Our Little Web Site',
-bgcolor=>'#000000', -text=>'#000000'
),
$adbanner,
table(
{-border=>0, -width=>'100%', -height=>'97%',
-cellpadding=>0, -cellspacing=>0},
Tr(
td({-align=>'LEFT', -valign=>'TOP',
-rowspan=>2, -width=>'110',
-bgcolor=>'#FFCC00'},
$news_table),
td({-align=>'CENTER', -valign=>'CENTER',
-width=>'78%',
-bgcolor=>'#FFCC00'},
$nav_bar),
td({-align=>'CENTER', -valign=>'TOP',
-rowspan=>2,
-bgcolor=>'#FFCC00'},
$book_table)
),
Tr(
td({-align=>'CENTER', -valign=>'TOP',
-height=>'80%',
-bgcolor=>'#ffffff'}, $qd_table
)
)
);
end_html;
This last bit of code actually comes from the code I'm writing for the new Graphics Muse web site. I have a common table definition for all pages (the table printed after the $adbanner in the last example), and modules for assigning HTML formats and data to the $news_table, $nav_bar and $book_table. Then each main CGI script fills in the $qd_table variable with page specific data. In this way I can make modifications to the way data is displayed in, for example, the news_table by only having to edit one script. Management of the site becomes much more simple than having to edit all the scripts each time a single change to news_table needs to be made and I avoid annoying many users by avoiding the use of frames.
In the short time I've been using Perl I've grown to truly appreciate both its sophistication and its simplicity. Things that should be simple to do are simple. Additional tools like CGI.pm and Msql make integrating Perl with my Web site a breeze. I've managed to rebuild my Web site from the ground up in less than a a couple of weeks and I'm not even making full use of what Perl can do for me. If you manage a Web site and have access to the cgi directory you should definitely consider learning Perl, CGI.pm, and one of the many databases which Perl supports.
|
 One of the more interesting plug-ins in the Gimp is Qbist, written by and based on an algorithm from Jörn Loviscach that appeared in the magazine c't in October 1995. I've had quite a good time playing with this plug-in creating backgrounds for logos and other images. The filter is really pretty easy to use. The plug-in dialog is made up of a set of 9 preview windows. By clicking on any one of these the entire set is updated with new previews and the preview you clicked on is displayed as the new middle preview. This central preview is used as a basis to generate the rest of the previews. You can generate a set of previews that are somewhat similar to the basis preview by clicking on the middle preview. In most cases, at least one of the previews will be significantly different from the basis. Selecting another preview usually generates quite different previews, but this isn't always guaranteed.
 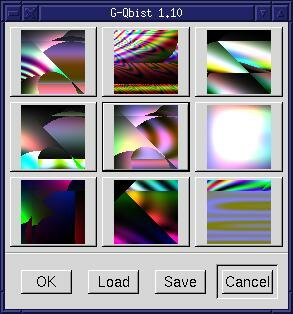 The algorithm is sufficiently random to make it possible that not only can the other non-basis previews be radically different, they can also be nearly exactly the same as the orginal. From a creative standpoint, I find this rather interesting. At times, when I'm tired of coding or writing, I pull this filter up and start to become creative. The patterns it generates are on the edge of randomness, with just enough recognizable geometry to make you say "No, thats not quite right, but its close". The problem, of course, is it keeps you saying this ad infinitum until you realize its long past midnight and you have just enough time for one cup of coffee and a shower before you have to be to work. But this is the kind of creativity I used to feel with coding when I first got my hands on PC (ok, it was a TRS-80, but you get the point). Its refreshing to feel it again.
Once you've selected the preview you want in your image, making sure its been selected and is displayed as the basis preview, you can add it to the current layer of your Image Window by clicking on OK.  Qbist will fill the entire layer, or the active selection, with a scaled version of the basis preview. Since there are no blend modes for Qbist the selection/layer will be completely overwritten with the Qbist pattern. The real trick to using these patterns comes from being able to make selections out of the geometrically connected pieces, creating drop shadows from the selections and slipping other images or text inbetween the layers.
Another problem is that the Save/Load options don't deal with a Qbist-specific directory. A number of other plug-ins manage saved files within directories under the users $HOME/.gimp directory. It shouldn't be difficult to update Qbist to do the same. Its just a matter of getting around to updating the code.
Speaking of the code, a quick examination of the source to Qbist shows some hard coded values used in various places that appear to be the sort of values that should be user configurable. The interface could be expanded to allow the user to change these. I may try this sometime soon, just as an experiment to see how changes to these values affect the previews.  Since I'm not familiar with the algorithm its unclear if these values are necessarily specific or just good initial seed values. Another option might be to allow the user to choose some color sets from which Qbist could render its patterns. Right now Qbist chooses colors on its own, without input from the user.
Finally, probably the most annoying aspect to Qbist is that there are no blend modes available. I'd love to be able to render a Qbist pattern in one selection and then use another selection to blend a different pattern over a corner of the first selection. I can do this with multiple layers, but it would be more convenient to be able to do this from within Qbist itself. Qbist renders it patterns in both the previews and the image window fairly quickly, so changes like adding blend modes shouldn't cause serious performance problems.
Qbist is a plain fun filter. Like many of the Render menu filters, Qbist gives you a chance to explore some of your true creativeness. By letting you wander through a random collection of patterns it lets you play with your computer in a way that a game can never quite equal. Although your control over these patterns is a bit limited, the patterns themselves are sufficiently fascinating to make Qbist a filter well worth exploring.
|
| © 1997 by |